Showing posts with label eating with your hands. Show all posts

Saturday, 19 September 2009

rice paper rolls

Miss T made some delicious rice paper rolls at Sunday's potluck, and it was these we were thinking of on Thursday night when we decided to make some. I love rice paper rolls! They are quick and easy to make (if you have someone giving you a hand, or if everyone rolls their own), and I always enjoy eating something that's basically raw vegetables dipped in soy sauce.

rice paper rolls

For the filling, I made two types of tempeh, garlic + soy, and five-spice. The garlic + soy idea came from Tempting Tempeh, light soy, garlic, sugar, smidge of sesame oil. The five-spice was my usual, five spice + dark soy + light soy. Marinated both sets of tempeh for a few hours, whilst we traipsed out to Collingwood and Richmond for vegan adventures. The rest of the filling comprised of beehoon (rice noodles), thin strips of raw capsicum, thin strips (using the potato peeler) of carrot, and a whole lot of bean shoots.

It was a team effort, filling and rolling the rice paper, and it was delicious. Eat immediately, whilst still fresh.

Use tamari instead of soy sauce to make this gf. and skip the five spice.

Tuesday, 12 May 2009

garlic bread

I love a good garlic bread, with a crisp crust and soft, perfectly-cooked insides. The proportions of garlic to margarine to herbs are different for everyone, but it's so important that they're juuuust right.

This is how D and I like to make it.

garlic bread

Garlic Bread

ingredients
2 damper buns
1 and a half tsp minced garlic
3 tablespoons nuttelex
a whole lot of dried parsley

method
Mix together the garlic, nuttelex and parsley, until well combined. Leave to sit for ten to fifteen minutes. Cut the buns in half, and spread thickly on cut side with the garlic butter. Bake at 160C for about 15-20 minutes, or until crispy but sort of soft.

Serve as as side or a snack. This is a great way to use up some of those one or two remaining buns from when you end up buying a six pack.

Wednesday, 6 May 2009

picnic food: pizza pinwheels

Today is a beautiful Autumn day here in Perth, 27C as I type this and nice and warm in the sun. Although by early May we've usually shifted into slightly cooler weather, it's a little behind this year and we've been taking advantage of this by going on picnics where possible.

This is a super fast and very easy picnic idea for your next picnic. It was actually my first try making them, and I'm very happy with how they turned out. Plus, picnics! How I love them.

pizza pinwheels

pizza pinwheels

ingredients
sheets of puff pastry, defrosted
some tomato paste
dried oregano
fresh basil, torn
freshly cracked pepper
awesome and malleable fillings such as thin pieces of marinated artichoke hearts, or sun-dried tomatoes

method

Grab a sheet of puff pastry, smear with tomato paste all the way from the end closest to you, across the edges, and leave about a centimetre of pastry free of paste at the side away from you. Shake over oregano, and some fresh basil and pepper, quantities to your preference. At this point you can roll it straight up, or add some artichokes or something that rolls. Roll it up, starting with the side closest to you, not super tight but still quite compact. Leave to sit in a roll in the fridge, and continue with another sheet. After the roll has been in the fridge for about ten minutes, cut through the roll into about eight pieces.

Place on a baking tray flat, that is with an open end facing up and the other facing down.

Bake, single layered, in the oven at 150C for ten to fifteen minutes, or until the puff pastry has started to puff. You may need to flip them halfway through. Eat hot or cold.

Thursday, 30 October 2008

sushi

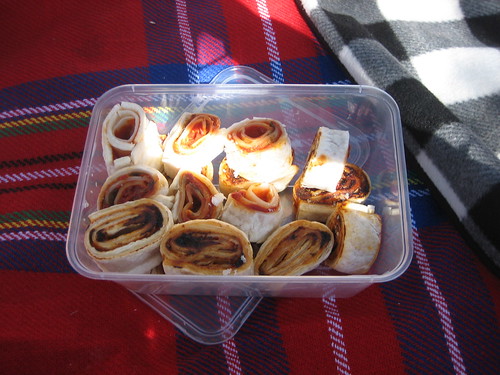
I went to a sushi party once in first year uni, but I hated vinegar so my friends made the rice with no vinegar. The sushi was pretty average, and I didn’t bother trying sushi again. About a year after I had been vegetarian (and shortly before I went vegan), I was at an event and thought I’d give the sushi a go. It was amazing, and I have been obsessed with it since. It makes a fantastic “I have no leftovers! What shall I take to work?” sort of lunch, and makes a pretty good change from sandwiches (which can also be pretty awesome).

sushi

sushi

Aside from obvious things, you will need a bamboo sushi mat. You can buy this in your local Asian supermarket (or even in most Woolies/Coles). Metal spoons can apparently change the flavour of the rice, I can’t verify this as I use wooden spoons but I have heard the metal reacts with the vinegar or the mirin. So that’s your myth to consider, if you so wish.

ingredients
two or three nori sheets
one cup of sushi rice
two tablespoons rice wine vinegar
one tablespoon mirin
1½ cups of water
some combination of three of the following:
quarter capsicum
half a large carrot
half a dozen snow peas
large handful of bean sprouts
half an avocado
ten cm length of cucumber
alfalfa

method
Bring the rice and water to a boil, stirring, then reduce to really low, and simmer for ten or twelve minutes with the lid on. Prepare the veggies: julienne carrots, snow peas, capsicum, and cucumber. I like to slice the avocado width-ways, and take the tails off the bean sprouts.

When the rice is soft and cooked, remove from heat. Stir the vinegar and mirin through, and cool. I like to do this with a paper fan whilst stirring, but if you’re feeling lazy you can just leave it to cool in the air.

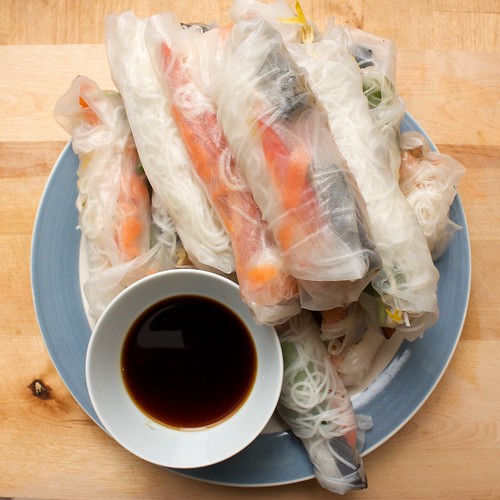
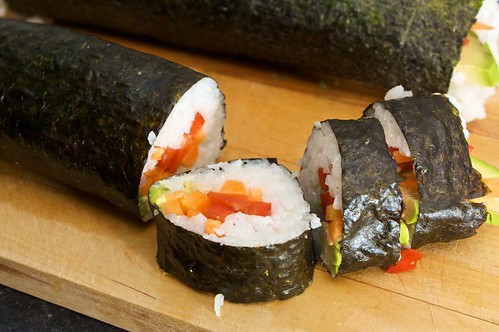
Place a nori sheet on the bamboo mat with the slats running horizontally. Make sure you have it on the right side, or you won’t be able to roll. This should be the side closest to you. Keeping the nori right up against the edge of the bamboo mat, spread about a third of the rice in a thin layer across about one half to one third of the nori on the side closest to you. Then lay out the filling across no more than the bottom half of the rice (ie, closest to you).

Moisten your hands (I usually have a small bowl with a little water in it handy) and firmly roll the bamboo mat. The nori will roll within the sheet. This is much easier than rolling without. There shouldn’t be any seaweed swirl going on, if the proportions are right it should just roll together without a swirl. As you can see from these photos, I misjudged the ratio of rice to filling just slightly, so resulting the opposite problem to swirl, which is filling nestled next to the nori.

This amount will usually make about two or three rolls, depending on how fat with rice you like your sushi. Of course it is not necessary to strictly stick to these fillers and proportions, I have just provided them to give some idea of amounts.

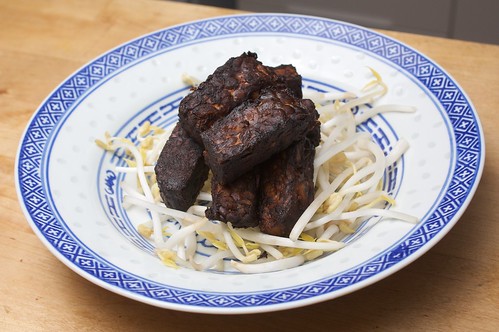
I want to try the five spice tempeh as a filler, I think it will be excellent with some avocado and bean sprouts.

Wednesday, 22 October 2008

bruschetta

A couple of weeks ago we invited S and Dr A around for dinner. S is ethnically Indian, so when I asked "Asian or not-Asian" she leapt for the non-Asian option, at which point I started fretting - I didn't know what to cook! The old faithfuls, that always, always work, are curries and laksa and things with noodles. Venturing out of that territory feels like hit or miss, though I know, logically, that I am getting pretty good with it all.

D suggested we give bruschetta a go, as the pre-entree snack. Which brings me to a slight aside: because I've grown up in Australia, when I say 'entree' what I mean is 'small first course.' I was so confused the first time I read Vegan with a Vengeance, wondering why the entrees were so late in the book, and why they were so substantial...

I've only had bruschetta a few times in my life, so I don't know how close this is to being actual bruschetta, but it was tasty and I believe it meets the general requirements (bread, fresh tomato, basil, not too much else), so I'm going to call it a success.


bruschetta


bruschetta

ingredients:
one long stick of crusty bread
olive oil
tomatoes
basil
parsley
red onion
salt
pepper

method

I don't think measurements are strictly required in this instance, as your bread stick could be ridiculously long, you might like lots of red onion, etc. But in general:

Slice the bread into rounds, brush with olive oil, and bake at 150C for 15 minutes. Meanwhile, as your kitchen is filling with lovely bread-baking smells, dice the tomato and red onion, and combine with shredded basil, shredded parsley, a dash or two of salt and pepper, and a little extra olive oil. Leave to sit, and when the bread is crisp , dollop the tomato mixture on top. Serve as soon as possible.

Tuesday, 21 October 2008

five spice tempeh

I love the taste of five-spice. One of the first things I made my mum teach me to cook was five-spice chicken, marinated for hours and fried in the wok and baked. I remember watching her so many times as I was growing up, the noise of the wok and the smell of the spice and it was actually the last thing I cooked involving meat.

I’ve put it out of my mind for years, unable to decide what could hold its shape and yet soak in the flavour of the spices. Potato wouldn’t take to the frying, and tofu would fall apart, and no other vegetable would have the right texture. I’m not a huge fan of tempeh, but in a wave of inspiration I decided to give it a go last week, and it went exactly the way that I felt it should, even though my five spice is a little old. The tempeh was spicy, and crisp, and that smoky, delicious flavour was just as I remembered it, and I made it again last night.

5-spice tempeh

five spice tempeh

ingredients
1 pack tempeh
1 tablespoon 5-spice
4 tablespoon dark soy
1 tablespoon light soy if the mixture is looking a bit strong

You will need a gas burner, and a wok. You might get away with using a frying pan, but frying pan is a different style of frying and I take no responsibility for any lack of wok-hei or change in cookability that you may encounter.

method
Mix together the five spice and the dark soy, until the spice has dissolved. If it’s looking a bit too overwhelming, add a dash or two of light soy. Slice the tempeh into fingers about 15mm by 10cm, then coat in the marinade. There should be enough marinade to coat the tempeh, and still have a bit of liquid floating around the bottom of the container. Sit for at least an hour in the fridge.

Wok on the stove, burner up high. Put a little bit of peanut oil in a wok, no more than two tablespoons, and swirl around up the sides. Using chopsticks or tongs, place the tempeh first in the middle, where the oil should be starting to pool, and then up in the ring around the centre, where the flames hit the wok. Don’t do all of the tempeh at once, at least not if you’ve never used this technique before – perhaps do six or seven slices at one time. Turn each slice, occasionally but not constantly swirling the oil through the centre and up the ring (just when it looks like you need more oil up there), for about three or four minutes. Remove the tempeh to a tray, and continue wok frying until all the tempeh has been through the wok. Spread on oven tray, and bake on 180C for about fifteen minutes, turning halfway.

The wok crisps up the outsides, and the oven allows it to gently bake the flavour through. The oil left has this great crispy, spicy wok-hei kind of flavour, which last night I used to fry sliced mushrooms, something I will elaborate upon in another post.

Serve the tempeh any way you please, I like to serve it on a bed of bean shoots or cucumber, or just eat it straight from the oven.

Thursday, 14 August 2008

pumpkin, sweet potato and spinach triangles

I love puff pastry. Pumpkin, sweet potato and spinach are all delicious, but wrapped in puff pastry they are nomlicious. I arrived home on Tuesday, bored and tired thanks to my Industrial Ecology lecture, and D was spooning the mixture into the puff pastry and covering the kitchen in oil, it was a great way to come home, especially as the kitchen started to fill with the smell of baking pastry.

Of course the fact that this recipe was created by D is why it uses frozen spinach. I am just disclaimering!

sweet potato, pumpkin and spinach puffs

pumpkin, sweet potato and spinach triangles

ingredients
one sweet potato
one half small butternut pumpkin
one packet of frozen spinach
three large sheets of puff pastry
rosemary
sage
poppy seeds
oil to brush


method
Boil and mash sweet potato and pumpkin. Soften/warm up the spinach, combine with the sweet potato and pumpkin, and add rosemary and sage to taste. We used dried herbs, but fresh would work fine.

Cut each sheet into quarters. Spoon approximately two tablespoons of mixture into one corner of each square. 'Approximately' because my heaped tablespoon might be heaped much higher than yours, so use your judgment. Fold corner to corner and seal and crimp with a fork (on both sides). Brush both sides with oil, shake some poppy seeds on top. Bake for about 30 minutes at 190C.

NOM.

Wednesday, 2 July 2008

apple danish

pastry and tea

Since the success of last week’s pastry-based experiment, I’ve been thinking about the other delicious things I can make with puff pastry. After many days of deliberation, I decided the number one priority was to try making apple danishes, a treat that I have long missed.

apple danish

This recipe is fast and simple, and quite possibly going to be a great new addition to dessert times at dinner parties.

ingredients

2 green apples
nuttlex
¼ tsp cinnamon powder
Shake or two of ground nutmeg
1/8 cup of brown sugar
1 or 2 large squares of puff pastry

method
Peel and dice the apples. I like to use Granny Smiths for baking and desserts (though not for fruit salad). Melt a tablespoon or two of margarine in a pot, add the apples, cinnamon, nutmeg and brown sugar. Allow to simmer for fifteen minutes. The apples should be soft, but should retain their shape. Remove the pot from the heat, and leave to cool.

Cut the puff pastry in to four squares. Depending on how much mixture you like to use and how big the apples are, you will need between four to eight squares. Spoon the apple mixture into the centre of each square, I think two or three tablespoons is about right. Fold two opposite corners to meet in the middle over the apple mixture, press to seal. Brush with melted margarine.

Bake at 220C for 15 to 20 minutes. Eat hot, but remember that apple mixture burns! I always learn that one the hard (but delicious) way.